Wednesday 29 April 2015

Flying High


     We have a new challenge over at The Male Room, we would like to see Birds on your masculine themed card. Please pop over and see the DT inspiration, including the great cards from our new teamies, Jane and Sue T.
     My card reflects my love of the seaside, I happily spend hours just walking along collecting shells and driftwood, it's somewhere I like to go and blow the cobwebs away.
     There are a mixture of stamps from Creative Expressions and Inkadinkado used on this card, all stamped with Distress Ink Chipped Sapphire. I have worked the ink a little with a damp paintbrush on the gulls wings and the beach.
     The image panel is mounted on a white card blank that has had the edge coloured with Chipped Sapphire. this way it matches the image, a simple card that could be used for any occasion.
   

I would like to enter this card in the following challenges:
Crafty Boots - Things With Wings
Scrappy Hands - Blue and White
Cardz 4 Guyz - Flight

Monday 27 April 2015

Golden Daisy


     Another project for Creative Expressions using John Lockwood stamps, this time it's the Daisy Corner set. I love this set, the daisies are gorgeous and the bubbles are such a great touch.

      I have stamped the main image on Foundations Black card and embossed with Cosmic Shimmer Detail True White. It is best to use an anti-static bag when embossing, it's a little bag of fine powder that you wipe over the card before you stamp, it helps reduce static and remove finger marks made with the natural oils on your skin. This is especially important when using detail powders, they are very fine and will stick to almost any mark.
     I wanted to give the daisies a little bit of colour, so I have used Cosmic Shimmer Drawing Inks. They are inks with mica in them, they have a very fine brush, a bit like an eye liner so you can paint tiny areas of colour.
     There are some tiny yellow gems stuck on some of the bubbles to add a bit more sparkle, these are stuck on with Cosmic Shimmer Dries clear PVA.
     For the mat layer I have stamped the daisy head in black on white card and embossed in Cosmic Shimmer Clear. You may just be able to see some faint daisies on the card, these were stamped in Perfect Medium and dusted with the anti-static bag, a bit of a mistake but I liked the effect so I left it.
     To finish I have coloured the edge of a white card blank using Distress Ink Black Soot and allowed to dry before mounting the white layer. The gems raise the card a little, but only a couple of millimetres so it's still alright to post without causing extra cost.

Materials used
John Lockwood Daisy Corner stamp set
Cosmic Shimmer Embossing Powders - Detail True White / Clear
Cosmic Shimmer Drawing Inks
Cosmic Shimmer PVA - Dries Clear
Creative Expressions Foundations Card - Black / Coconut White
Perfect Medium Ink
Archival Ink - Jet Black
Distress Ink  - Black Soot
Anti-static Bag


I would like to enter this card in the following challenges:
My Time To Craft - Spring Flowers
Paper Creator's Crafts - Flowers
Ladybug Crafts - Anything Goes
Card Mania - Flowers

Friday 24 April 2015

CASEd Kitty


     CASE-ing Christmas this week has a lovely card by DT member Cohenna to use. We would love you to join us at the challenge, all you need to do is CASE the card of the week and show us your creation. You might be inspired by the colours, the layout or the image, it's up to you.
     For me it was the layout that caught my imagination, I have also combined it with a few other Christmas challenge elements, like using a digi image of a cat.
     The digi was a freebie I found on Santalady, it's so cute, who could resist. It's been coloured with alcohol markers and matted on gold paper. The ivy die is from Marianne, inked before removing from the die to get the veins. To finish I've used some red gems found at a well known discount shop at Christmas.
     A very simple card, sometimes it's good to make something less fussy, it helps clear the mind by going back to basics. Please come and join us, I know the good weather makes us think less about Christmas but if you make your cards now you'll have more time for planning food and gifts.


I would like to enter this card in the following challenges:
Merry Monday - Use a Dog or Cat
The Glory Of Christmas - Use A Digi Stamp
The 12 Months Of Christmas - Anything Goes (optional colour challenge)
52 Christmas Card Throwdown - Christmas Cats


Monday 20 April 2015

Nouveau Scribble Roses


     When I saw these stamps I thought Rennie Mackintosh, I love Art Nouveau so that meant a simple but stylish card. I hope to have achieved that with this one.
     It is a very quick and easy card to make, sometimes we need ones like that when we're caught out by a forgotten occasion.

     I have used a square of white card and stamped John Lockwood's Scribble Rose flowers in the corners, these stamps are available from Creative Expressions via your local craft shop.
     Once the flowers were stamped and embossed in Cosmic Shimmer Black I coloured them in with alcohol markers.
     Using a ruler I measured equally spaced lines to run from the flower to meet in the other corner.
     The image panel is then mounted on a white card blank that has had the edges coloured with the same marker as the flowers so it matches.
     This would also be a very good card for posting as it's only two layers and has no embellishments on it either.

Materials used
John Lockwood Scribble Rose stamp set
Cosmic Shimmer Black embossing powder


I would like to enter this card in the following challenges:
Allsorts Challenge  - Quick and Easy
Sisterhood Of Snarky Stampers - Quick


Wednesday 15 April 2015

It's All About Numbers


     This fortnights challenge at The Male Room is all about letters or numbers. Create something masculine that includes either of these and you can come and join us.
     I started with a piece of chocolate pearl card, then I embossed it with a Spellbinder folder. To colour it I have used Cosmic Shimmer Gilding Waxes in Chic Pumpkin, Teal, Spring Green and Autumn Bronze.
     The cogs are die cut using a Spellbinder die set borrowed from a friend, these cogs are cut in thin greyboard. They have also been coloured using the same waxes but with the emphasis on Pumpkin to make them look rusty. The smallest cog has a screw top brad through it. All the cogs are stuck on with Cosmic Shimmer PVA, it really is strong stuff.
   
     The locomotive plate at the top is a Creative Expressions stamp from the Vintage Inventor set, stamped in Archival black and embossed in clear. I wanted this to look like brass so it has been coloured with Golden Light Gilding Wax. This is mounted on foam pads.
     The ticket is also a Creative expressions stamp from a set called Celebration Tickets. This is stamped on Kraft in Archival Ink Coffee and embossed in clear, it is also mounted on foam pads.
     The coloured panel is stuck on to a Kraft card blank using red line tape, I used the extra strong tape just in case any wax got on the back of the panel, I don't want it to drop off later.
     Please come and join us at The Male Room, we have two new DT members to give you extra inspiration.


I would like to enter this card in the following challenges:
Crafting From The Heart - Anything Goes

Monday 13 April 2015

Butterfly Explosion


     I am so pleased to get the chance to play with some of the John Lockwood stamps for Creative Expressions this month. Today's project is made using the Butterfly Dreams set.  I was given an exploding box to decorate (thanks Avril) which was perfect for the butterflies.

      I began by decorating the outside of the box base while it was still flat. I have only stamped three sides with the Butterfly Dreams Striplet so the back can be written on.
     I have used Perfect Medium and Cosmic Shimmer Bright Gold embossing powder.
      I then assembled the box and added the bars inside. The green layers were decorated with various stamps from the set, all embossed in gold. I have used pearls from a Pearl Swirl that I had left over from another project to decorate the bubbles and the flowers.
     The flowers are die cut using Spellbinder dies and the greenery is the Classic Vine die by Couture Creations from last month. The butterflies are stamped and embossed on heat resistant acetate and coloured with Sakura Stardust gel pens, unfortunately they don't sparkle well in the photograph.
     When folded flat it will fit inside a 7x5 envelope, it is a little bulky for posting but would be perfect for hand delivery.
     There is a Spellbinder die available that cuts these exploding boxes, it would save all the measuring, just cut and assemble.....S5-233 Pop Up Box.


Materials used
CE John Lockwood Butterfly Dreams / Butterfly Dreams Striplet
CE Self Adhesive Pearl Swirl
CE Cosmic Shimmer PVA Glue - Dries Clear
CE Cosmic Shimmer Embossing Powder - Bright Gold
Perfect Medium
Spellbinder Die - S5-102 Aster Flower Topper / HCD 727 Vintage Floret
Heat Resistant Acetate


I would like to enter this card in the following challenges:
Amusing Challenge - Butterflies
Glitter N Sparkle - Include A Butterfly
Jo's Scrap Shack - Florals And Butterflies

Friday 10 April 2015

Peace On Earth


     Today is the beginning of another CASE-ing Christmas Challenge, this week we are case-ing a card by DT member Ellen. I was intending to stay with the beautiful simplicity of Ellen's card but I got carried away a little.
     I cut two pieces of card to act as mat and top layer on my card blank. I coloured the edge of the bigger piece with a blue alcohol marker. Then I stamped a bauble in the centre and embossed in Cosmic Shimmer Silver Shine, coloured in with a slightly lighter shade of blue.
   
     The top layer I cut a bauble shape out using Spellbinder Heirloom Ornament 2011 so that the hole would sit above my stamped bauble, then I embossed it with a Creative Expressions A4 folder called Snowflake Lattice. This layer is mounted on Stix2 foam tape so that it sits about 2mm above the blue layer.
     I was going to leave it there but it looked a little blank and not as elegant as Ellen's card, so I decided to add a tiny blue gem to each embossed snowflake.
     Please come and join us at CASE-ing Christmas, we'll help you build up your card stash so that December isn't such a rush.


I would like to enter this card in the following challenges:
Tis' The Season - Getting Bluesy
Christmas Cards All Year Round - Christmas ornaments
Christmas Card Challenges - Colour Challenge Blues
The Glory Of Christmas - Blue and Silver
The 12 Months Of Christmas - Optional Colour Challenge


Monday 6 April 2015

Jeepers Creepers


     Today I have a card made using a Woodware stamp called Sneakers. This stamp lends itself perfectly to the technique of paper piecing. I've chosen to make a masculine card but it could just as easily be made for a girl, just use feminine patterned paper instead.
     The sneakers are stamped on white thin card and on patterned paper and embossed in black. I have cut the patterned paper image to become the canvas upper, leaving the white for the sole. I have coloured with a grey alcohol marker inside the shoe and the toes, just to darken them a little. The laces are coloured with a white gel pen and the lace holes with a silver gel pen.
     The sneakers are cut out and mounted on a patterned paper, the gaps between the lace bow are tiny so I have coloured them to match the backing paper rather than cut it all out. The word 'style' is another Woodware stamp from a set called Graffiti, stamped and embossed in black and then coloured in with an alcohol marker. The little star on the heel is also in the Sneakers set, this is stamped on white and coloured, then cut and stuck on the shoe.
     The mat layer is a white card piece coloured on the edge with the same marker as the word so that it matches, it is then mounted using Stix2 double sided tape on a white card blank.
     Both Woodware and Stix2 products are available from your local craft shop, please support your independent retailer, they need you!


I would like to enter this card in the following challenges:
Operation Write Home - Masculine 
Sweet Stampin' - Paper Piecing
Simply Papercraft - Anything Goes  (New Blog)
Cardz 4 Guyz - Something Beginning With S


Wednesday 1 April 2015

Butterfly In The House


     This month at the House Of Cards we have 'Add a butterfly or use the colours' challenge, if you wish you can do both.
     I have opted for a simple card this month, I felt the sentiment lent itself to a basic design. It is a stamp set from Heartfelt Creations called Hydrangea Posy, it comes as rubber on cling mount and pre cut.
     I have stamped in Archival Ink Jet Black and embossed in clear, I also stamped a small spare piece of card so I could cut out one flower. The single coloured flower has been painted with Cosmic Shimmer Drawing Ink Lilac Blue on the front and a blue alcohol marker on the back. Once cut out and stuck on to the flower head I have glued a small pearl in the middle.
   
     The butterfly is a Sizzix Mover and Shaper die cut in white card, then stamped in Archival Black using a JustRite background stamp, embossed in clear and painted with Cosmic Shimmer Midnight Blue drawing ink. I have glued three tiny pearls down the body of the butterfly after colouring the back with a blue alcohol marker.
     The main image panel is mounted on mauve pearl paper and then on to a white card blank, with the flower and butterfly being added at the end.
 
     We would love you to join us at the House Of Cards with your interpretation of this challenge, you have a month to come up with a card that has a butterfly or fits the colour challenge or both.


I would like to enter this card in the following challenges:
The Sisterhood Of Crafters - Come Fly With Me
Mod Squad - Tic Tac Toe (Butterfly,Die Cut, Dimension)

Triple Embossed Shield


     Welcome to another Male Room challenge, this fortnight we would like you to use some metallic embossing powder. You could emboss your image or make an embossed embellishment, the choice is yours.
     I have chosen to use the triple embossing technique on the shield to make it a feature of the card. I have used a die cut shape made using Sizzix die Regal Crest, cut in greyboard. Before adding any powder to the shield I have coloured the edges with a dark yellow alcohol marker to hide the grey.
     Triple embossing is when you build up three layers of powder to create a smooth enamelled look. Using Perfect Medium I inked up the shield and started off with a layer of Ultra Thick Clear embossing powder, once cold I added another layer of clear. The third layer is Cosmic Shimmer Bright Gold embossing powder, by using clear for the first two layers I have saved using up all my gold.
     Before heating the last gold layer I have inked up my stamps with Archival Ink Jet Black, there is little time once the powder has melted to stamp into it. The stamping must be done while the powder is still soft, the ink will help the stamp release when set.

     I started with a white card blank but decided to colour it red with Distress Ink Festive Berries, you only need colour the edge that will show. The backing paper is from a scrapbook page, it was just the right thing for this card. I have a reel of washi tape with cars on it so I have added a strip across the bottom. The tape didn't wrinkle at all when I embossed the 'Limited Edition' at the bottom of the paper.
     The green garland and red banner are also on the same die as the shield. The garland is stuck straight on to the backing with the shield mounted on foam pads over it. The banner is also on foam pads but does have a peel off as I couldn't find a greeting stamp the right size.
     You have two weeks to create something for a man or boy using metallic embossing powder, then come and show us at The Male Room.

I would like to enter this card in the following challenges:
     

Boot Sale Bronze


     Welcome to a new project for Altered Eclectics, where anything goes as long as it's altered art or mixed media (no cards, ATC's or scrap layouts). You should pop over and take a look at the variety of artwork on show, it's amazing!
     This little beauty started life with me as a rather shabby, pre-loved manikin found at a boot sale. She used to have a velvet body with beads hanging around the bottom but that all came off the day she arrived in the Crafter Cavern.

     Once striped bare she had a good rub down and then a few body enhancing changes with flexible filler, then another rub down, which left her with a nice smooth surface.
     Using Sizzix Tim Holtz Elegant Flourishes and grey board I cut several shapes out and glued them on to the manikin with Cosmic Shimmer PVA.
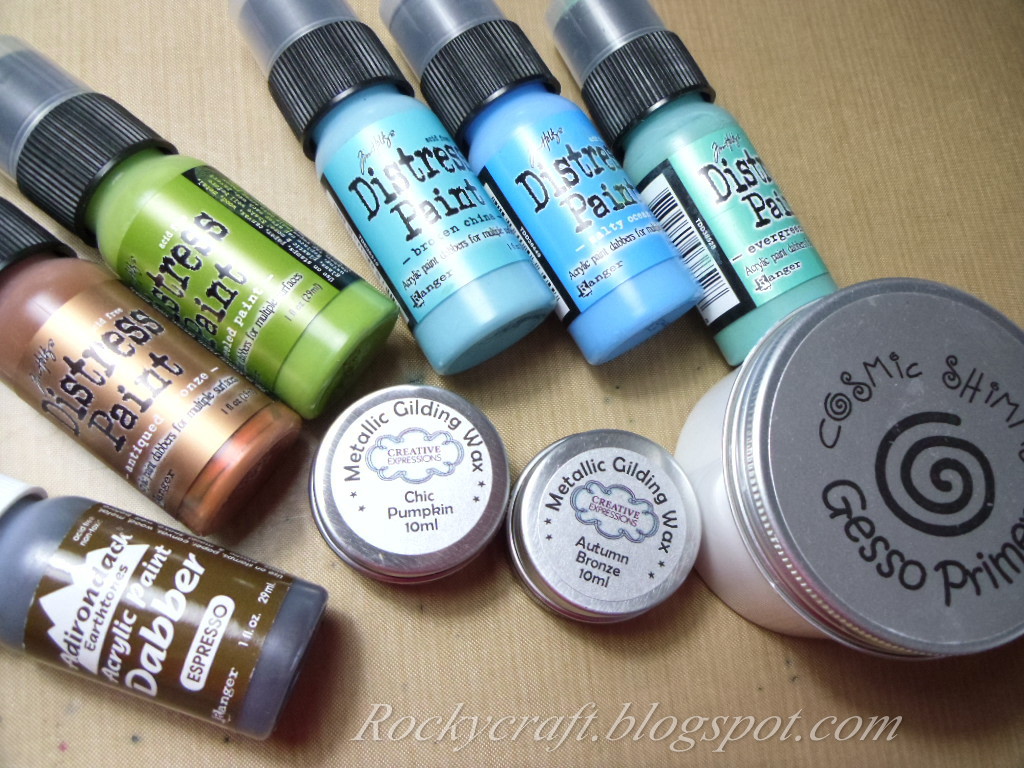
     To begin the painting process I covered her with a coat of Cosmic Shimmer White Gesso Primer, I was pleasantly surprised to find one coat was enough.

     When the gesso was dry I began to paint patches of colour all over the manikin. Once the colours where dry I went over with a brown acrylic to tone it down a little.
     Leaving the paint to dry thoroughly seemed like an age but it was only about an hour. I really wanted to get started with the Cosmic Shimmer Gilding Waxes, I used Chic Pumpkin and Autumn Bronze .
   
     There are small areas of Chic Pumpkin and larger areas of Autumn Bronze because it has that perfect dark brown hue.
     I then had to be patient again, to allow the wax to set, buffing it up too early would remove some of it and I'd have to do it a second time.
     With an old duster I buffed the manikin all over, being careful not to rub the ends of the swirls too hard. It came up with a gorgeous sheen to it. It had all been an experiment to see if it what was in my head would transfer, via my hands, to the manikin. I am happy to say that I think it did, it's not until you pick it up that you realise it 's too light to be metal.

     You have a whole month to create something, anything as long as it's altered art or mixed media, no cards. We would love to see what you make at Altered Eclectics.

I would like to enter my manikin in the following challenges:
Creative Moments - Anything But A Card
613 Avenue Create - A True Anything Goes...No Twist
Artful Times Challenge - In The Style Of Tim Holtz
Rhedd's Creative Spirit - Altered Art/Mixed Media Only
Through The Craftroom Door - Anything Goes
Through The Purple Haze - Anything Goes


Merry Christmoose


     It's time for another challenge at CraftyHazelnut's Christmas Challenge Extra. I couldn't resist this cute moose, he reminds me of Marty the zebra in the film Madagascar. The image is from Bugaboo Digi Stamps who kindly sponsor our challenge.
     The image is printed on to white card stock and coloured with alcohol markers, the baubles are coloured with a Sakura Stardust pen so they have a little sparkle to them.
     The finished image was matted onto silver mirri card and then on to a background paper from my stash which I used to cover a white 7x5 card blank. When I cover cards with paper I always take about 1/2 inch over the fold and stick it on the back, I have found this gives a neater finish to the card.
     He was a very simple card to make this time, he is available without the greeting so you could personalise the card if you wished.
     Please pop over and join in the festive fun at CraftyHazelnut's Christmas Challenge Extra, we accept anything seasonal, not just cards.


I would like to enter my moose in the following challenges: